dwm is an ultra-minimal tiling WM written in C. Ubuntu offers a binary package, but it’s kind of pointless since the only way to configure dwm is by editing its source code and recompiling. Instead we will grab the latest source from the project website directly.
First install the dependencies needed for compiling dwm along with the package suckless-tools which contains a bunch of utilities for use with dwm.
$ sudo apt-get install build-essential libx11-dev libxinerama-dev sharutils suckless-tools
Now grab the dwm source code from the project website and extract it locally.
$ cd /usr/local/src
$ sudo wget http://dl.suckless.org/dwm/dwm-6.0.tar.gz
$ sudo tar xvzf dwm-6.0.tar.gz
$ chown -R `id -u`:`id -g` dwm-6.0
$ cd dwm-6.0
Before proceeding further with compilation, have a look at the README file. It tells you to modify the config.mk file to match your system. However the defaults work just fine on a normal Ubuntu system. So, go ahead and compile!
$ sudo make clean install
At this point, dwm is installed as /usr/local/bin/dwm, but you still need to add an entry for dwm so that it shows as an option in your login screen. For this we will install dwm from the repositories which, as I said before, is not of much use. But, it will also install a file /usr/share/xsessions/dwm.desktop which is what we need. So we will back up this file, remove dwm, and restore the backup file.
$ sudo apt-get install dwm
$ sudo cp /usr/share/xsessions/dwm.desktop{,.bak}
$ sudo apt-get purge dwm
$ sudo mv /usr/share/xsessions/dwm.desktop{.bak,}
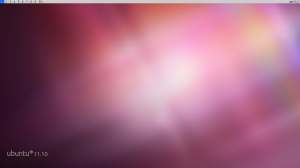
Now we are all set to log in to our dwm setup! So log out and log back in to dwm session to be greeted with a shiny new desktop that looks something like this:
There you go, unabashed simplicity for you, right there. No oversized icons to waste screen space, no system trays, taskbars, panels to distract you and no apparent way to launch applications. What you do have is an narrow bar running along the top edge of the screen displaying some numbers and symbols with “dwm-6.0” written in the right corner. This bar is known as….we’ll just call it bar for now. Try pressing Alt+B to toggle the bar visibility. The numbers you see are virtual desktops (called tags in dwm) – dwm provides 9 of them by default. Try Alt+[Num] to switch between tags. The weird “[]=” symbol you see next to the tags is your current tiling layout. dwm offers three layouts by default – tile ([]=), monocle ([M]) and float (>). The “dwm-6.0” string you see in the far left can actually be changed to show useful information like current date, time, network status, battery status etc.
This is a good time to get yourself acquainted with dwm’s keyboard shortcuts. Remember, keyboard shortcuts are of prime importance in tiling WMs and you should know them as your life depended on it. You can configure them to your liking, but it helps to get acquainted with a few default ones:
Alt+Shift+Enter
    Launch xterm
Alt+Shift+C
    Kill a client (a window, if you must insist)
Alt+t
    Switch to tile layout
Alt+m
    Switch to monocle layout
Alt+f
    Switch to floating layout
Alt+b
    Show/hide bar
Alt+p
    Launch dmenu
Alt+[num]
    Switch to tag [num]
Alt+Shift+Q
    Quit dwm
dmenu is an application launcher from the author of dwm following the same minimalist philosophy as dwm. It is a part of the suckless-tools package we installed earlier.
Now we will try out the tiling modes of dwm. First close any open clients (Alt+Shift+C) and switch to tile mode (Alt+t). Now open up xterm using dmenu. Press Alt+p and you should see the bar get replaced by something like this
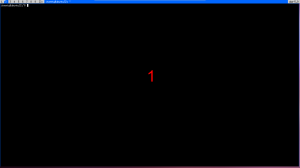
Start typing the name of the app you wish to launch, and once dmenu has narrowed down the search, select it using arrow keys and press Enter. Launch xterm this way. It will occupy the entire screen. (Number 1 has been added by me)
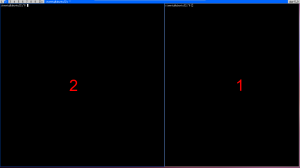
Open another xterm client (using either dmenu or Alt+Shift+Enter). You will find the previously open xterm automatically resize and move to make space for this newly opened xterm.
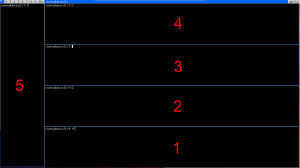
Here, area 1 is called the master area and area 2 is called the stack area. The master area can hold a single client while the stack area holds all the remaining ones. Any newly opened clients always occupy the master area and the existing clients gets pushed into the stacking area. Open up a couple more xterms to see how it works You can switch focus between clients using Alt+j and Alt+k. Focused clients are denoted by a blue border while the rest have gray border. You can move a focused client from stacking area to master area using Alt+Enter. Play around with these shortcuts till you get the hang of how exactly the tiling works. Finally, you can change the ratio between master and stacking areas using Alt+h and Alt+l.
Now switch over to monocle layout (Alt+m) to have the focused client occupy the entire screen. Note how the “[]=” sign in the bar changes when you switch layout. This layout is equivalent to maximized windows in floating WMs. Note that Alt+j, Alt+k and Alt+Enter shortcuts will work in this layout too.
The final layout is the floating layout which is equivalent to your conventional floating WMs. Move the clients around using Alt+LMB+Drag and resize them using Alt+RMB+Drag. Note that you can switch individual clients into floating mode without affecting the layout of the rest by using Alt+Shift+Space. Floating clients always stay above the tiled ones.
Tags in dwm are a more powerful version of virtual desktops in KDE/Gnome etc. A client can have more than one tag associated with it and you can view all clients from any number of tags simultaneously. Use Alt+[num] to view all clients having tag [num], Alt+Ctrl+[num] to view clients having tag [num] in additon to currently visible clients, Alt+Shift+[num] to associate focused client to tag [num] and Alt+Ctrl+Shift+[num] to associate in addition to current tag associations.
There is still a lot more tweaking you can do before you using dwm as a full-fledged replacement for Unity. This includes configuring a system tray so you can use NetworkManager applet under dwm, displaying some meaningful information in the bar instead of the the curt “dwm-6.0”, configuring dwm by editing it’s source code (Have a look at /usr/local/src/dwm-6.0/config.h file to get started) and making your gnome themes and settings carry over to your dwm session (if you open any gnome apps at this point, they will have an ugly theme and unreadable fonts).
PS: Use “nautilus –no-desktop” in dmenu to launch nautilus, or else it will mess up your dwm session. A default rule in dwm specifies firefox should open in tag 9 by default. Happy tiling!


Pingback: » dwm – Setup and config. .:: talueee blog ::.
Great tutorial. Thanks.
Very helpful! Thanks
You meant “as if your life depended on it”?
Like any other person, I accidentally launched nautilus without the options 🙂 In case anyone else does it:
ALT+CTRL+F1
login and enter the following command:
killall nautilus
ALT_CTRL_F7
🙂
Very Nice Tutorial….Thank you! Will give it a go during holiday….Xmas – New Year 2015
Pingback: Ubuntu HowTo: how to use DWM and patch it in Ubuntu 20.04 gnome? - TECHPRPR
Pingback: Very Basic Vim and Command-line Stuff desu Plus some keyboard shortcuts | SOS Brigade Club